
For many, the worlds of electronics and programming might seem daunting, shrouded in technical jargon and complex theories. However, the reality is far from intimidating, especially when you have a fun and engaging project to dive into. If you’re someone who enjoys coding and has ever been fascinated by the inner workings of machines, or perhaps dreamt of controlling your own miniature vehicle, then building an Arduino remote controlled car is the perfect starting point. This project not only demystifies electronics and programming but also brings the nostalgic joy of RC cars into the realm of DIY tech.
This guide will walk you through creating your very own Arduino-based RC car from scratch. You don’t need to be an expert programmer or electronics whiz to get started. Whether you’re a complete beginner or have some experience, these step-by-step instructions will make the process accessible and enjoyable. We’ll be using readily available components, focusing on a clear and detailed explanation of the code, and leveraging the convenience of a power bank for easy and reusable power. This project is designed to be a foundational learning experience, with techniques and principles that can be applied to a wide range of future electronics endeavors. So, let’s embark on this exciting journey and bring your own Arduino Remote Controlled Car Program to life!
Before we begin, it’s worth noting that this guide is built upon established methods and aims to provide a comprehensive yet simplified approach. It emphasizes practical application and understanding, making it ideal for hands-on learners. While we’ll be focusing on the Arduino code and its functionality, remember that the real magic lies in the interplay of hardware and software. Let’s get started and transform those lines of code into a moving, controllable vehicle!
Materials You’ll Need
To build your Arduino RC car, you’ll need the following components. These are commonly available online and in electronics stores, making this project easily accessible.
- Arduino UNO: The brain of your operation, this microcontroller will execute your arduino remote controlled car program and control the car’s movements.
- Car Chassis Kit (with wheels and motors): Provides the physical structure of the car, including the motors that will drive the wheels. Kits often come with basic assembly instructions.
- Jumper Wires (male-male and female-male): These wires are essential for connecting the various electronic components together.
- Electrical Insulation Tape: For securing wires and providing insulation to prevent short circuits.
- Bluetooth Module (HC-06 or HC-05): Allows wireless communication between your Android phone and the Arduino, enabling remote control.
- DC Motor Controller (L298N): An essential component to efficiently control the speed and direction of the DC motors.
- Power Bank (with 2 USB outputs): A convenient and rechargeable power source for both the Arduino and the motor controller.
- Piezo Buzzer: Adds an auditory element to your RC car, allowing for sound effects.
- Android Mobile Phone: Used to install the ArduCar app and control the RC car via Bluetooth.
- PC with Arduino IDE installed: You’ll need a computer with the Arduino IDE (Integrated Development Environment) to write, compile, and upload your arduino remote controlled car program to the Arduino board.
- ArduCar – Arduino RC Car Bluetooth Controller App: A ready-made Android application designed to control Arduino RC cars via Bluetooth.
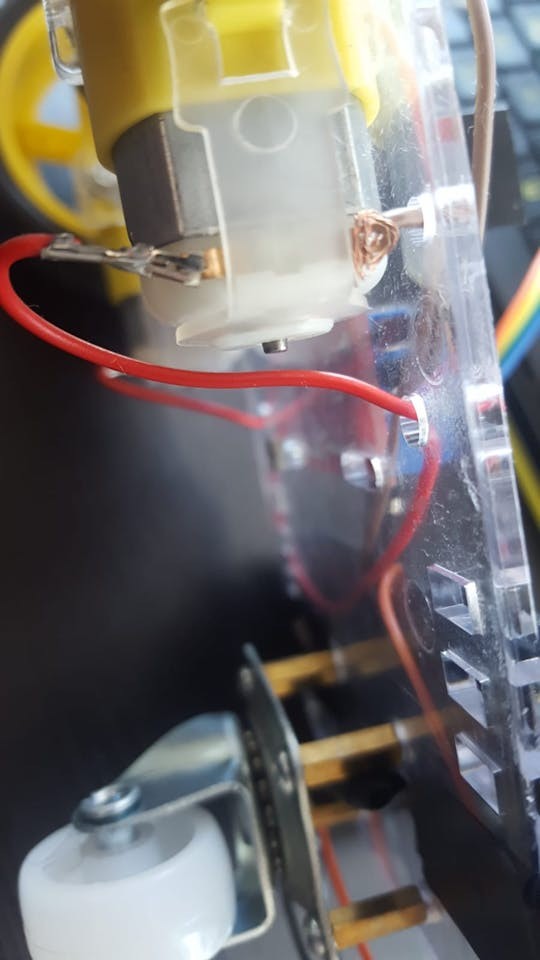
Step 1: Assembling the Car Chassis
The first step is to assemble the chassis of your RC car. Most chassis kits come with their own assembly instructions, which you should refer to. However, here’s a general guide to help you through the process:
- Gather the main chassis components: the chassis base, motor mounting brackets (usually 4 small plastic pieces), screws, brass spacers, nuts, motors, a spare USB cable, and jumper wires.
- Prepare the motors by connecting wires to each pin. Soldering is ideal for a robust connection, but if you don’t have a soldering iron, you can securely twist or “knot” the wires to the motor pins.
-
Take an old USB cable and cut off one end, leaving about 20cm of cable.
-
Carefully strip a few centimeters of the outer cable sheath to expose the internal wires. You should find 4 or 5 wires, but we’re only interested in the red (positive – Plus) and black (ground – GND) wires. Strip about 2-4cm of insulation from the ends of the red and black wires. You can leave them as they are, or for a stronger connection, twist or solder them to longer, more durable jumper wires.
-
Mount the motors onto the chassis frame using the plastic brackets, screws, and nuts. Notice the small “dot” on one side of each motor; this dot should face inwards, towards the center of the chassis when both motors are mounted.
- Locate the four small holes near the end of the chassis frame, typically arranged in a square pattern. These are for the supporting nylon wheel. Take the brass spacers and attach them to these holes using screws, ensuring the spacers are on the same side of the frame as the motors.
- Attach the nylon supporting wheel to the brass spacers using screws.
- Push the wheels onto each motor shaft. You’ll notice a specific shape inside the wheel hub that needs to align correctly with the motor shaft. It might require a bit of force, but be gentle and ensure they are securely attached.
- Now, mount the Arduino UNO board and the L298N DC motor controller onto the chassis frame. You can use leftover screws and nuts from the kit. Use electrical tape to insulate any exposed wires to prevent shorts.
Step 2: Wiring the Electronic Components
With the chassis assembled and the modules mounted, it’s time to connect everything together. Use your jumper wires for this step.
-
Connect the wires from the motors to the L298N DC motor controller. The motor controller has screw terminals for easy connection. If we consider the pins closer to the edge of the board as negative (GND) and those further in as positive, connect them as follows:
- OUT1: Left motor (-) GND wire
- OUT2: Left motor (+) wire
- OUT3: Right motor (+) wire
- OUT4: Right motor (-) GND wire
-
Now, connect the Arduino UNO to the L298N motor controller using female-male jumper wires. The IN1, IN2, IN3, and IN4 pins on the motor controller are control inputs. Connect them to the Arduino’s digital pins as follows:
- IN1: Arduino Digital Pin 5
- IN2: Arduino Digital Pin 6
- IN3: Arduino Digital Pin 10
- IN4: Arduino Digital Pin 11
-
Connect the Bluetooth module to the Arduino. The Bluetooth module (HC-06 or HC-05) typically has 4 pins: VCC, GND, TXD, and RXD. Use female-male jumper wires to connect them:
- VCC: Arduino 5V pin (Power)
- GND: Arduino GND pin (Ground)
- TXD: Arduino Digital Pin 0 (RXD – Receive Data)
- RXD: Arduino Digital Pin 1 (TXD – Transmit Data)
Note the cross-wiring of TXD and RXD – the transmitter of one device connects to the receiver of the other, and vice versa.
-
Connect the piezo buzzer. It has two legs: a longer Anode (+) and a shorter Cathode (-). While a 330 Ohm resistor is often recommended for piezo buzzers, it can reduce the volume significantly. For this project, you can connect it directly, but be mindful of potential damage if overdriven for extended periods. Use female-male jumper wires:
- Anode (+) (long leg): Arduino Digital Pin 3
- Cathode (-) (short leg): Arduino GND pin (Ground)
- Power the circuit. Connect the USB cable you prepared earlier to the L298N motor controller for motor power. Connect the red wire (+) to the 12V terminal and the black wire (-) to the GND terminal on the motor controller.
- Finally, connect two USB cables to your power bank. One cable will power the Arduino UNO (plug into the Arduino’s USB port), and the other will power the DC motor controller (plug the USB cable connected to the motor controller into another USB port on the power bank). Secure the power bank to the chassis using electrical tape or another mounting method. Some power banks have a power button, so ensure it is switched on.
With all the wiring complete, your RC car hardware is ready. Now, let’s move on to programming the Arduino.
Step 3: Programming Your Arduino
To bring your RC car to life, you need to upload the arduino remote controlled car program to the Arduino UNO board.
- Install Arduino IDE: If you haven’t already, download and install the Arduino IDE from the official Arduino website (https://www.arduino.cc/).
- Configure Arduino IDE: Open the Arduino IDE. Go to “Tools” > “Board:” and select “Arduino Uno”. Then, go to “Tools” > “Port:” and select the serial port that your Arduino is connected to. The port number may vary depending on your computer. If you’re unsure, connect the Arduino, and check for new ports appearing in the list.
- Upload the Code: You can either copy and paste the code provided below into a new Arduino IDE sketch (File > New) or download the code file and open it in the IDE. Before uploading, disconnect the Bluetooth module’s TX and RX wires from Arduino pins 0 and 1. This is crucial because these pins are used for communication during code upload, and interference from the Bluetooth module can prevent successful uploading. Click the “Upload” button (the right arrow icon) in the Arduino IDE to upload the code to your Arduino board. Ensure your Arduino is connected to your PC via USB during this process.
#define in1 5
#define in2 6
#define in3 10
#define in4 11
int state;
int piezo = 3;

void setup() {
  pinMode(in1, OUTPUT);
  pinMode(in2, OUTPUT);
  pinMode(in3, OUTPUT);
  pinMode(in4, OUTPUT);
  pinMode(piezo,OUTPUT);
  Serial.begin(9600);
}

void loop() {
  if (Serial.available() > 0) {
    state = Serial.read();
    Stop();
    switch (state) {
      case 'F': forward(); soundFX(3000.0,30+400*(1+sin(millis()/5000))); break;
      case 'G': forwardleft(); soundFX(3000.0,60); break;
      case 'D': forwardright(); soundFX(3000.0,60); break;
      case 'N': backright(); soundFX(3000.0,30+100*(1+sin(millis()/2500))); break;
      case 'C': backleft(); soundFX(3000.0,30+100*(1+sin(millis()/2500))); soundFX(3000.0,30+100*(1+sin(millis()/2500))); soundFX(3000.0,30+100*(1+sin(millis()/2500))); soundFX(3000.0,30+100*(1+sin(millis()/2500))); break;
      case 'B': back(); soundFX(3000.0,30+200*(1+sin(millis()/2500))); soundFX(3000.0,30+200*(1+sin(millis()/2500))); soundFX(3000.0,30+200*(1+sin(millis()/2500))); soundFX(3000.0,30+200*(1+sin(millis()/2500))); break;
      case 'L': left(); soundFX(3000.0,60); soundFX(3000.0,60); soundFX(3000.0,60); soundFX(3000.0,60); break;
      case 'R': right(); soundFX(3000.0,60); soundFX(3000.0,60); soundFX(3000.0,60); soundFX(3000.0,60); break;
      case 'H': soundFX(3000.0,30+200*(1+sin(millis()/2500))); soundFX(3000.0,60); soundFX(3000.0,30+200*(1+sin(millis()/2500))); soundFX(3000.0,60); break;
    }
  }
}

void forward() {
  analogWrite(in1, 255);
  analogWrite(in3, 255);
}

void forwardleft() {
  analogWrite(in1, 50);
  analogWrite(in3, 255);
}

void forwardright() {
  analogWrite(in1, 255);
  analogWrite(in3, 50);
}

void back() {
  analogWrite(in2, 255);
  analogWrite(in4, 255);
}

void backright() {
  analogWrite(in2, 50);
  analogWrite(in4, 255);
}

void backleft() {
  analogWrite(in2, 50);
  analogWrite(in4, 50);
}

void left() {
  analogWrite(in4, 255);
  analogWrite(in1, 255);
}

void right() {
  analogWrite(in3, 255);
  analogWrite(in2, 255);
}

void Stop() {
  analogWrite(in1, 0);
  analogWrite(in2, 0);
  analogWrite(in3, 0);
  analogWrite(in4, 0);
}

void soundFX(float amplitude,float period){
  int uDelay=2+amplitude+amplitude*sin(millis()/period);
  for(int i=0;i<200;i++){
    digitalWrite(piezo, HIGH);
    delayMicroseconds(uDelay);
    digitalWrite(piezo, LOW);
    delayMicroseconds(uDelay);
  }
}- Reconnect and Power Up: Once the code is successfully uploaded, reconnect the Bluetooth module’s TX and RX wires to Arduino pins 0 and 1. Then, reconnect the USB power cables (Arduino to power bank and motor controller to power bank).
- Install and Use the App: Download and install the “ArduCar – Arduino RC Car Bluetooth Controller” app from the Google Play Store on your Android phone. Alternatively, you can explore other Bluetooth RC car control apps that send compatible serial commands or even develop your own app for a customized control experience.
- Enjoy Driving! Launch the ArduCar app, connect to your Bluetooth module (you may need to pair your phone with the Bluetooth module first via your phone’s Bluetooth settings – default pairing code is often 1234 or 0000), and start controlling your newly built Arduino RC car!
Step 4: Understanding the Arduino Code and Bluetooth Configuration (Optional)
For those interested in delving deeper into the code and customizing their RC car further, here’s a breakdown of the arduino remote controlled car program.
Every Arduino program is structured into two primary functions:
-
void setup() { }: This section runs only once when the Arduino board starts. It’s used to initialize settings, such as defining pin modes.In our code:
void setup() {
  pinMode(in1, OUTPUT);
  pinMode(in2, OUTPUT);
  pinMode(in3, OUTPUT);
  pinMode(in4, OUTPUT);
  pinMode(piezo,OUTPUT);
  Serial.begin(9600);
}
pinMode(in1, OUTPUT);configures digital pin ‘in1’ as an OUTPUT pin, meaning the Arduino will send signals through this pin to control another component (in this case, the motor controller). This is repeated for pins in2, in3, in4, and the piezo buzzer pin.Serial.begin(9600);initializes serial communication at a baud rate of 9600 bits per second. This is the speed at which data will be exchanged between the Arduino and the Bluetooth module. 9600 is a common and stable baud rate for Bluetooth communication. -
void loop() { }: This section runs continuously after thesetup()function completes. It contains the main logic of your program, constantly monitoring inputs and controlling outputs.void loop() { if (Serial.available() > 0) { state = Serial.read(); Stop(); switch (state) { case 'F': forward(); soundFX(3000.0,30+400*(1+sin(millis()/5000))); break; case 'G': forwardleft(); soundFX(3000.0,60); break; case 'D': forwardright(); soundFX(3000.0,60); break; case 'N': backright(); soundFX(3000.0,30+100*(1+sin(millis()/2500))); break; case 'C': backleft(); soundFX(3000.0,30+100*(1+sin(millis()/2500))); soundFX(3000.0,30+100*(1+sin(millis()/2500))); soundFX(3000.0,30+100*(1+sin(millis()/2500))); soundFX(3000.0,30+100*(1+sin(millis()/2500))); break; case 'B': back(); soundFX(3000.0,30+200*(1+sin(millis()/2500))); soundFX(3000.0,30+200*(1+sin(millis()/2500))); soundFX(3000.0,30+200*(1+sin(millis()/2500))); soundFX(3000.0,30+200*(1+sin(millis()/2500))); break; case 'L': left(); soundFX(3000.0,60); soundFX(3000.0,60); soundFX(3000.0,60); soundFX(3000.0,60); break; case 'R': right(); soundFX(3000.0,60); soundFX(3000.0,60); soundFX(3000.0,60); soundFX(3000.0,60); break; case 'H': soundFX(3000.0,30+200*(1+sin(millis()/2500))); soundFX(3000.0,60); soundFX(3000.0,30+200*(1+sin(millis()/2500))); soundFX(3000.0,60); break; } } }if (Serial.available() > 0)checks if there is any data available to read from the serial port (i.e., from the Bluetooth module). If data is available,state = Serial.read();reads the incoming byte and stores it in thestatevariable.Stop();immediately calls theStopfunction to halt any current motor movement before processing the new command. Theswitch (state)block then checks the value of thestatevariable. Eachcasecorresponds to a character sent from the Android app: ‘F’ for forward, ‘B’ for back, ‘L’ for left, ‘R’ for right, and so on. For each case, a corresponding function (likeforward(),left(),soundFX()) is called to control the motors and sound effects.break;ensures that after a case is executed, the control exits theswitchblock. -
Motor Control Functions: Functions like
forward(),back(),left(),right(), andStop()control the DC motors by sendinganalogWrite()commands to the motor controller pins.analogWrite()is used to control the speed of the motors by using PWM (Pulse Width Modulation) on the digital pins. A value of 255 corresponds to full speed, and 0 corresponds to no speed. By varying theanalogWrite()values to different motor pins, we can achieve different movements like turning and going forward/backward. -
Sound Effects Function: The
soundFX()function generates sound effects using the piezo buzzer. It uses trigonometric functions to create varying frequencies, producing a Sci-Fi-like sound. You can explore and modify this function to create different sound patterns. -
Bluetooth Configuration (Optional): While HC-05 and HC-06 Bluetooth modules often work out-of-the-box, you can configure parameters like baud rate, name, and password. This usually involves sending AT commands to the module via the Arduino serial monitor. Numerous online tutorials provide detailed steps on Bluetooth module configuration if you wish to customize these settings.
This project provides a solid foundation for understanding arduino remote controlled car program concepts and basic robotics. Feel free to experiment with the code, add more features, and customize your RC car to your liking. Happy building and driving!