
Computer graphics in C offer a fantastic way to visualize programming concepts and create fun, interactive applications. Using the graphics.h library, you can draw various shapes and objects with simple functions. This tutorial will guide you through creating a classic “moving car” animation using C programming. We’ll break down the code step-by-step, explaining the key functions and concepts involved in building this engaging visual program. This project is perfect for beginners looking to explore the creative side of C programming and understand fundamental graphics principles.
Understanding the Tools: Graphics.h and Essential Functions
To get started with graphics programming in C, the graphics.h header file is your primary tool. It provides a set of functions that allow you to draw shapes, manipulate colors, and control the graphics display. Let’s explore the core functions we’ll use to create our moving car program:
initgraph(&gd, &gm, ""): This function initializes the graphics system.gdstands for graphics driver andgmfor graphics mode.DETECTautomatically detects the best driver and mode for your system.line(x1, y1, x2, y2): As the name suggests, this function draws a straight line. You need to provide the starting coordinates(x1, y1)and the ending coordinates(x2, y2)to define the line’s position and length.circle(x, y, r): This function draws a circle.(x, y)specifies the coordinates of the circle’s center, andrdetermines its radius.setcolor(n): This function sets the drawing color.nis a color code representing a predefined color (likeRED,BLUE,BLACK,WHITE, etc.) available ingraphics.h.delay(n): This function pauses the program execution fornmilliseconds. It’s crucial for animations, controlling the speed at which frames are displayed, making the movement visible to the human eye.cleardevice(): This function clears the entire graphics screen, effectively erasing everything drawn previously. It’s useful for creating animations where you need to redraw the scene in a new position or state.
Example 1: Animating a Car Without cleardevice()
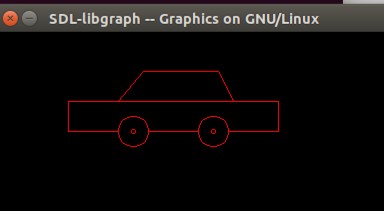
This first example demonstrates a basic approach to creating a moving car effect. Instead of clearing the screen and redrawing the car in a new position, we draw the car in a new position and then redraw the previous car in black (assuming a white background) to give the illusion of movement. Let’s look at the C code:
// C program to draw a moving car. This
// program run in gcc compiler having
// graphics.h library installed
#include <graphics.h>
#include <conio.h>

// Function to draw moving car
void draw_moving_car(void) {
    int i, j = 0, gd = DETECT, gm;
    // Passed three arguments to initgraph
    // function to initialize graphics mode
    initgraph(&gd, &gm, "");
    for (i = 0; i < 420; i = i + 10) {
        // Set color of car as red
        setcolor(RED);
        // These lines for bonnet and
        // body of car
        line(0 + i, 300, 210 + i, 300);
        line(50 + i, 300, 75 + i, 270);
        line(75 + i, 270, 150 + i, 270);
        line(150 + i, 270, 165 + i, 300);
        line(0 + i, 300, 0 + i, 330);
        line(210 + i, 300, 210 + i, 330);

        // For left wheel of car
        circle(65 + i, 330, 15);
        circle(65 + i, 330, 2);

        // For right wheel of car
        circle(145 + i, 330, 15);
        circle(145 + i, 330, 2);

        // Line left of left wheel
        line(0 + i, 330, 50 + i, 330);

        // Line middle of both wheel
        line(80 + i, 330, 130 + i, 330);

        // Line right of right wheel
        line(210 + i, 330, 160 + i, 330);

        delay(100);

        // To erase previous drawn car, draw
        // the whole car at same position
        // but color using black
        setcolor(BLACK);

        // Lines for bonnet and body of car
        line(0 + i, 300, 210 + i, 300);
        line(50 + i, 300, 75 + i, 270);
        line(75 + i, 270, 150 + i, 270);
        line(150 + i, 270, 165 + i, 300);
        line(0 + i, 300, 0 + i, 330);
        line(210 + i, 300, 210 + i, 330);

        // For left wheel of car
        circle(65 + i, 330, 15);
        circle(65 + i, 330, 2);

        // For right wheel of car
        circle(145 + i, 330, 15);
        circle(145 + i, 330, 2);

        // Line left of left wheel
        line(0 + i, 330, 50 + i, 330);

        // Line middle of both wheel
        line(80 + i, 330, 130 + i, 330);

        // Line right of right wheel
        line(210 + i, 330, 160 + i, 330);
    }
    getch();
    closegraph();
}

// Driver code
int main()
{
    draw_moving_car();
    return 0;
}
Explanation:
- The
draw_moving_car()function encapsulates all the graphics drawing code. initgraph()initializes the graphics mode.- The
forloop controls the car’s horizontal movement. In each iteration,iincreases by 10, effectively shifting the car to the right. setcolor(RED)sets the drawing color to red for the car.line()andcircle()functions are used to draw the car’s body, bonnet, and wheels. Notice howiis added to the x-coordinates of each drawing function. This is what makes the car move horizontally.delay(100)introduces a 100-millisecond pause, controlling the animation speed.- Crucially, after drawing the car in red, the code then redraws the same car using
setcolor(BLACK). This overwrites the previous red car with black, effectively erasing it from the display, creating the illusion of movement when the next red car is drawn at a slightly shifted position. getch()pauses the program until a key is pressed, allowing you to see the final animation before the graphics window closes.closegraph()closes the graphics system and releases memory.
Here’s what the output looks like:
Example 2: Animating a Car with cleardevice()
A more efficient and cleaner way to create animation is using the cleardevice() function. Instead of redrawing the previous frame in black, cleardevice() simply clears the entire screen before drawing the new frame. This approach is generally preferred for more complex animations as it’s less prone to visual artifacts and easier to manage. Let’s look at the modified code:
// C program to draw a moving car. This
// program run in gcc compiler having
// graphics.h library installed
#include <graphics.h>
#include <conio.h>

// Function to draw moving car
void draw_moving_car(void) {
    int i, j = 0, gd = DETECT, gm;
    // Passed three arguments to initgraph
    // function to initialize graphics mode
    initgraph(&gd, &gm, "");
    for (i = 0; i < 420; i = i + 10) {
        // Set color of car as red
        setcolor(RED);
        // These lines for bonnet and
        // body of car
        line(0 + i, 300, 210 + i, 300);
        line(50 + i, 300, 75 + i, 270);
        line(75 + i, 270, 150 + i, 270);
        line(150 + i, 270, 165 + i, 300);
        line(0 + i, 300, 0 + i, 330);
        line(210 + i, 300, 210 + i, 330);

        // For left wheel of car
        circle(65 + i, 330, 15);
        circle(65 + i, 330, 2);

        // For right wheel of car
        circle(145 + i, 330, 15);
        circle(145 + i, 330, 2);

        // Line left of left wheel
        line(0 + i, 330, 50 + i, 330);

        // Line middle of both wheel
        line(80 + i, 330, 130 + i, 330);

        // Line right of right wheel
        line(210 + i, 330, 160 + i, 330);

        delay(100);

        // To erase previous drawn car
        // use cleardevice() function
        cleardevice();
    }
    getch();
    closegraph();
}

// Driver code
int main()
{
    draw_moving_car();
    return 0;
}
Key Change:
- The section of code that redrew the car in black in Example 1 is replaced by a single line:
cleardevice();.
Explanation of Changes:
cleardevice()is called at the end of each loop iteration, after the car is drawn and the delay is applied. This clears the entire screen, removing the previously drawn car.- In the next loop iteration, the car is drawn again at a new position, but this time on a clean screen, resulting in a smoother and more traditional animation effect.
The output of this code will look visually identical to the first example:
Conclusion: Driving Forward with C Graphics
This tutorial provided a basic introduction to creating a moving car animation in C graphics. You’ve learned how to use essential functions from graphics.h to draw shapes, control color, and create the illusion of movement. Experiment with the code, change colors, adjust speeds, or even add more details to the car or the background.
This simple project is a stepping stone to more complex graphics programming in C. By understanding these fundamentals, you can explore creating more intricate animations, interactive programs, and even simple games. Keep practicing and exploring the possibilities of computer graphics in C!